
This cake is my absolute favorite Passover dessert. Honestly, I’m not sure I should call it a Passover dessert because I would eat this any time of year.
When I’ve tried baking with coconut flour in the past, it wasn’t great and when I started working on this recipe, I didn’t have a lot of hope. But this one, this knocked my socks off!
The thing you have to know about coconut flour is that you need to use much less of it than you would regular flour (or almond or other flours). Coconut flour is made from the meat of the coconut. It’s dried and ground into a fine flour — one that is incredibly absorbent and sucks up a lot of moisture. So you need to use less coconut flour than you would white flour, and add more eggs than you normally would to help with the structure.
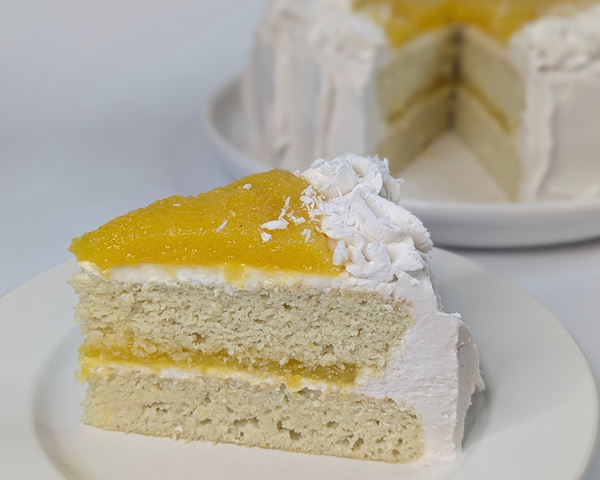
This recipe creates a delicious, moist cake with a light coconut flavour. What pairs well with coconut? Pineapple, of course!! I love this combination and it makes such a light, fresh cake, perfect for a Passover dessert. If you don’t love pineapple, you can switch the pineapple out for lemon curd or simmer some sliced strawberries with sugar and thicken with potato starch to make a strawberry filling.
This cake is naturally gluten-free and dairy-free but it’s full of flavour! It keeps beautifully for a few days, covered in the fridge.
Make this cake!
Gluten-Free Coconut Pineapple Cake (Passover)
This moist coconut cake it topped with a sweet and tangy pineapple filling and light coconut whipped cream.
Ingredients
-
Cake Ingredients:
- 6 large eggs
- 6 oz / 170 grams granulated sugar (3/4 cup)
- 1 x 400 mL can coconut milk (full fat, not lite and well shaken)
- 2 tsp. vanilla extract
- 4 tsp. baking powder
- 1/2 tsp. salt
- 5 oz / 140 grams coconut flour (1 1/4 cups)
- 1 large ripe pineapple, peeled, cored and diced (approximately 4 cups diced)
- 4 oz / 112 grams granulated sugar (1/2 cup) (if your pineapple is very sweet, you can reduce the sugar)
- 1/2 tsp. vanilla extract
- 2 x 400 mL cans full-fat coconut cream (not lite)
- 6 Tbsp. confectioner’s sugar
- 1 tsp. vanilla extract
- 1 small pinch of salt
- 1/4 cup shredded coconut to sprinkle on top of the whipped coconut cream
Pineapple Filling Ingredients:
Coconut Whipped Cream Ingredients:
Optional:
Directions
- The day before you bake this cake, place the 2 cans of coconut cream into the refrigerator, upside down.
- To bake the cake, preheat your oven to 350ºF / 175°C.
- Line two 8-inch round cake pans with parchment paper — don’t skip this step because the cake will stick to the pan. Spray or brush the parchment paper and sides of the pan with a neutral oil.
- In a mixing bowl, whisk the eggs and sugar together until well combined. Shake the can of coconut milk well, open, and add the contents of the can to the mixing bowl and whisk well, eliminating any small chunks of coconut. Add the vanilla extract and whisk in.
- In a smaller bowl, combine the baking powder, salt and coconut flour. Use a dry whisk to mix, and make sure any clumps of coconut flour are whisked out. Add this dry mixture to the wet ingredients, and working quickly, whisk until everything is combined and smooth.
- Continue to work quickly and divide the batter into the two prepared cake pans, using a spatula to spread evenly. Place into the preheated oven.
- Bake the cakes for 10 minutes, turn the pans and bake another 10-15 minutes or until a toothpick inserted in the middle comes out clean. The top of the cake won’t brown, but it should have an even colour and when you touch it, should feel set.
- Remove the cakes and let them cool completely.
- While the cake bakes, make the pineapple filling.
- Place the pineapple and sugar into a large sauté pan over high heat and cook, stirring, until the juices have released and come to a simmer. Reduce the heat to medium and simmer until the juices have reduced and thickened into a syrup. Add the vanilla and stir through.
- Carefully transfer the pineapple to a food processor and blitz until a paste forms. It can have some texture and doesn’t need to be smooth, but it should form a filling, versus lots of little chunks of pineapple. Transfer to a bowl and place in the refrigerator to cool completely.
- When the cake has cooled completely and the pineapple filling is chilled, you can assemble the cake.
- Place your mixing bowl and whip attachment in the refrigerator for 15-30 minutes before starting.
- Remove the two cans of coconut cream that have been in fridge for at least one day. This needs to be very cold. Remove the lids and use a spoon to scoop the solid coconut cream out of the can, leaving any coconut water in the bottom of the can – there should only be a few tablespoons of water left in the can. You can use this coconut water for another recipe or discard.
- Place all of the coconut cream, confectioner’s sugar, vanilla extract and salt into the bowl of a stand mixer. Using the whip attachment, whip the cream until it’s light and fluffy.
- Carefully remove one of the cake rounds from the pan and place on a cake plate, removing the parchment paper.
- Use a spatula to transfer some of the whipped coconut cream to the cake. Use an offset spatula to smooth out an even layer of cream on the cake. This doesn’t need to be thick – you’re aiming for approximately 1/4-inch of cream. Then, transfer 1 cup of whipped cream to a small pastry bag or freezer bag and snip off a corner, forming a 1/2-inch hole. Carefully pipe a circle around the outer edge of the cake. Any extra cream in the bag can be returned to the bowl of whipped coconut cream.
- Use a spoon to transfer half of the pineapple mixture to the center of the cake and spread it out so that it fills the piped circle.
- Remove the second cake from the pan and carefully centre it on top of the pineapple filling.
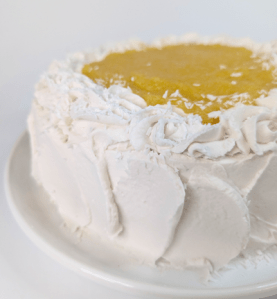
- Transfer approximately 1 1/2 cups of the whipped coconut cream to a pastry bag fit with an open star piping tip. Set aside. Using a spatula, transfer the rest of the whipped coconut cream to the top of your cake then use the offset spatula to spread it evenly on the sides and top of the cake. I use the offset spatula to make swooshes along the sides, but finish it off any way you like.
- Once the cake is evenly covered in cream, use the piping bag with the star tip to pipe a border around the top of the cake.
- Spoon the rest of the pineapple filling into the center of the cake and carefully smooth it out within the border. If you’d like, sprinkle a little shredded coconut onto the cream border.
- Refrigerate immediately and chill for at least one hour. Keep it in the fridge until you’re ready to serve. The whipped topping will melt if it’s too warm, so keep it in the fridge. This will keep well refrigerated for a few days, but keep it under a cake dome or stick a few toothpicks around the top of the cake and cover it loosely with plastic wrap.
Cake:
Pineapple Filling:
Coconut Whipped Cream:
Assembly:


[…] Coconut Pineapple Cake […]
do you have recipes for GF pancakes
My banana bread pancakes are GF! https://pamelareiss.com/2022/04/10/passover-banana-bread-pancakes/
This cake looks delicious. Can you tell me how difficult it is to make? All those steps make it look daunting.
It does look like a lot of steps but each step isn’t hard. It’s just that there are 3 components, but each one isn’t hard. (The cake whisks together in a bowl, the coconut whipped cream is just like making real whipped cream, you just have to chill the coconut cream. And the pineapple cooks quickly with sugar on the stove, puree it and chill. Then assemble.
Thank you for your quick response. I hope to give it a try!
I hope you do and enjoy it!